19 May 2010

Steamed meatballs: low fat, gluten-free, casein-free, yummy, versatile and they freeze like a dream.


I've been experimenting with steamed dishes lately, and got to wondering what would happen if I steamed some meatballs. What happened was some tasty magic. These meatballs steamed up beautifully, and tasted so delightful that I couldn't stop eating them as they came out of the steamer. The first time around I made only 40 meatballs, and they didn't even last until suppertime. So here's the recipe and method for making about 110 meatballs. That's enough to eat as many as you like as they come out of the steamer, enough for soup later on, maybe a few for breakfast, then freeze the rest to be popped into soup at another time.

I tried this recipe using various kinds of meat. The recipe below calls for 1.5kg of pork, but you can use chicken, or any combination of pork/beef/lamb. It also calls for cooked rice, so it is a good idea to cook some rice the night before, or at least a couple hours before you need to mix everything together.

Before getting started, wash and trim enough cabbage or romaine lettuce leaves to completely line your steamer.


Ingredients:
-1.5 kg raw boneless pork with fat trimmed off
-2 medium onions finely chopped
-3 medium carrots finely chopped
-1 extra-large egg, or 2 small eggs lightly beaten
-400 gm cooked white rice (arborio or other risotto-type rice is good)
-2 tablespoons dried and crushed thyme leaves
-1 teaspoon salt
Optional: 20 large leaves of swiss chard (blitva), washed (I'll explain later)

Method:
Get your butcher to coarsely grind your meat. I don't recommend using store-bought pre-ground meat because it tends to be too fatty and too watery. But if that's all you've got, then give it a try. If your butcher doesn't grind meat, then cut your meat up into small cubes, and in small batches, finely chop the meat in your food processor.

Put the meat in a large mixing bowl. Add your chopped onion and chopped carrot, salt and thyme. Add your beaten egg to the mixture. Mix thoroughly with a large spoon or with your hands. Then add the rice and use your hands to thoroughly mix the rice into the meat mixture.


Cover the bowl and place in the fridge for at least 30 minutes (2 hours is better) to let the flavours blend in.

Preparing your steamer:
Add hot water to the bottom of your steamer pot, then place the steaming basket on top of the water. Using your cabbage or romaine lettuce leaves, cover the steamer basket (this will ensure that your food does not stick to the steamer basket). Place lid on steamer, and allow the water to boil.


Remove meat mixture from the fridge, and using a teaspoon, scoop a bit of meat into your hand, and use the spoon to fashion a 2-3cm ball in the palm of your hand. Put the ball on a platter, and continue making balls until all of the meat is used up.


When the steamer is ready, place as many meatballs in the steamer basket as you can, making sure that none of the balls is touching the other balls. Put the lid on and steam for 30 minutes.


Optional: if you like swiss chard (blitva), then you can trim the swiss chard leaves like this:


Then add a meatball to the centre of the leaf,


and roll


Place these little swiss chard rolls in the steamer basket. It is okay if they touch each other. Put the lid on, and steam for 30 minutes.


Here's how it all looks when it is done.


Here's what the swiss chard rolls look like when you cut them open:


And here are the steamed meatballs added to my homemade minestrone and cabbage soup. Add a wee bit of salt to taste, and a generous drizzle of olive oil, and you've got an entire meal in a bowl. Healthy. Tasty. Really tasty.

11 May 2010

Spring has sprung...finally


Winter was rather loooooong, cold and wet. Spring took its time getting here. It was late by about 5 or 6 weeks. Fresh local lettuce and swiss chard is just starting to appear at the farmers market. But as they say: better late than never. In the meantime, the spring flowers have bloomed and are staying fresh longer due to the cooler weather. I thought I'd post some pictures of the types of flowers that just sort of grow EVERYWHERE. Above are giant boughs of purple wisteria that smell just like pink bubble-gum. Honestly. The bees LOVE this stuff.

Below, some more wisteria with wild chestnut tree in full bloom in the background:


White hydreangea:


Intense pink magnolia:


Jumbo pink peony bush. Unimaginable fragrance!

26 February 2010

Homegrown Hazelnuts


I've been wanting to post pictures and a little bit of information on my hazelnuts for a few months now. There are lots of hazelnut tree/shrubs all over the place---in backyards, in parking lots, along the side of the road. Harvest time is around October. I managed to get my hands on a few different varieties that were grown locally. The round and fat ones are really nice when they are rather freshly picked and haven't dried out yet. The longer ones are stupendous when they are dried out and then roasted. I tend to eat these just a few at a time. Once, I shelled a pound of hazelnuts so I could roast them. It took me an hour to do the shelling with my little sad nut cracker. The nuts roasted up beautifully! And we ate them in 14 minutes. I never roasted up a bunch again because I think I gave myself carpal tunnel syndrome ;-)


Round-fat ones:


These are the longer drop-shaped ones. Lovely!

22 January 2010

Squash that bakes like pie.....


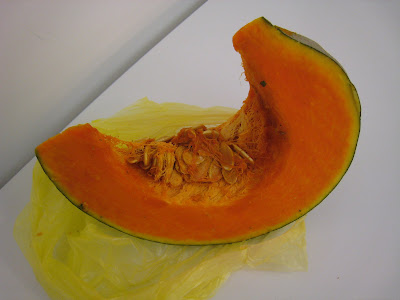
Here's a picture of a type of squash that is sort of like a big giant pumpkin. They call it bundeva. You don't have to take chances on buying one that is under-ripe or over-ripe, because the vendor at the farmer's market cuts the squash into giant slices so you can see the colour, feel the texture, and smell the pulp for freshness. They should be bright orange, firm, and smell like fresh cut pumpkin.

There are all sorts of things you can do with bundeva: make soup, chop and fry in butter, roast alongside your chicken, etc. But the way I like it is to just wash and dry the entire slice, then just stick it into a hot oven for about 20-25 minutes. A crust will form on the outside of the squash, and the inside will bake up creamy and delicious. It is almost like baked pumpkin pie!


I don't have pictures of the baked bundeva for the same reason that I don't have pictures of lots of my cooked foods (I eat them before I remember to get the camera out). I'll try and remember next time!

21 January 2010

Winter market bounty


The farmer's market runs right through the winter months. There's lots of local produce by way of cabbage, squash, pumpkins, onions, potatoes, garlic, and things like dried beans and dried figs and plums. What is in season right now is grapefruit, oranges, lemons, and a variety of apples (my picture above is from last October and features a local tomato which is not in season right now).

Plus these incredibly sweet miniature little mandarins, which are soooooooooo tiny that I allow myself to eat 6 in place of one orange!


And lemons too!

20 January 2010

Chestnuts & Xmas trees


So here are my long-ago promised pictures of chestnuts. These are a local variety that grow around these parts. They are not too big, and they are kind of a mellow-yellow colour inside. I roasted up a few in the oven and really meant to have pictures of them all toasty and golden, but I ate them before I could take a picture. One of the great winter treats around here though is to go to one of the chestnut roasters on the street and buy a cone filled with these fresh roasted wonders.

Here's a picture of the chestnut roaster on one of the corners the week before xmas. If you look closely, you can see a stack of white paper cones to the left of the cart. This is how they serve the chestnuts. You can't see, but on the top of the cart is a metal roasting pan that sits on top of hot coals. Of course, you can't tell from the picture, but the aroma coming from the chestnuts is incredible.

By the way, this is how they sell Xmas trees in Zagreb. About a week before Christmas, trucks arrive from everywhere and deposit Christmas tree vendors on corners throughout the city. They've got trees of all kinds.


You just pick out a tree, pay for it, then a guy (like the one to the right of the picture below), puts your tree through this big tube and wraps the tree in a tight netting so you can carry the tree home.


Yup, for real. You just carry the tree home like this:


It is a great system: first you pick out your tree, then you have it wrapped, then you stop and buy some chestnuts, eat the chestnuts, pop into the coffee shop and have an espresso, then work off the calories from everything while you carry your Christmas tree home.

12 January 2010

Grab your defibrillator, it's CVARCI time!!!


There is a special snack eaten in these parts around this time of year that is made from pure pork fat. Yup. Just plain old fat. The snack is called CVARCI (Čvarci pronounced chvartzy) and involves pork fat getting cut into cubes, deep fried, pressed, dried out, then eaten usually at room temperature with a bit of salt. Normally, people add a bit of milk to the hot oil to give the cvarci their golden brown color, but I can't handle the milk, and often can't eat cvarci prepared by others because there's a great chance of gluten cross-contamination due to the incredibly delicious pairing of crusty bread with the cvarci. So, if I want to eat these yummy snacks, I need to make my own (no bread for moi.)

Here's the recipe. Method. And pictures.

Ingredients:
Pork fat

Equipment:
Big pot
Slotted spoon
Potato ricer (also known as a squeezer)
Big bowl lined with paper towel
Large pan lined with paper towel

A special note: DO NOT EAT these in large quantities. There's a seeeeeeerious amount of fat and cholesterol in these babies. One handful is good as a serving. Also, DO NOT add salt to these until you are about to eat them because the salt will make them rather rubbery and kinda mushy. Only add salt to the handful (one handful) that you are eating.

Here's what the pork fat looks like. These pieces weigh about 2 pounds or 1 kg each. I bought 5kg for my session. Make sure that the skin has been removed.


The fat is about 1 inch or about 3cm thick.


Slice the fat into strips about 2 inches or 3 cm across. Then cut those strips into cubes about 2 inches or 3 cm. Don't worry if some are slightly bigger or smaller.


Put all the cubes into a cold, empty big pot. My pot holds 8 litres, and I filled it to the 6 litre line. Don't over-fill because you need to leave quite a bit of room for the fat to render out, and bubble up.


Once you have all your fat cut up into cubes, and you've put all your cubes into your pot, move the pot to your heat source, and put the heat up to about medium. You'll have to watch the heat constantly and adjust accordingly to keep this to a medium heat. Don't let it get too hot or else everything will burn. Using a large spoon or spatula, keep turning the cubes so that they don't stick to the bottom. It'll look like this:


Keep turning them, and after about 15 minutes, you'll be able to see the fat bubbling up like this:


Keep turning the cubes. They will start to brown. And they'll look like this after just another 5 or 6 minutes:


Until finally they will get really golden brown (but not burnt!) and they will float to the top like this.:


Using a slotted spoon, carefully scoop out the cubes and put them into a big bowl that is lined with paper towel to soak up some of the oil.


Now, you've got to scoop 5 or 6 cubes into the squeezer. Hold the squeezer over an empty bowl, and squeeze out as much oil as you can. Be careful because the oil will be very hot.


Then open the squeezer, and using a fork, loosen the flattened cubes, and shake out onto a large pan lined with paper towels. Remember DO NOT salt these.


In batches of 5 or 6 cubes, squeeze the oil out of all the cubes. Shake all your squeezed cubes onto the paper-towel-lined pan, leave the pan out on a table and let everything cool down and dry somewhat. You can eat the cvarci at this point...however, it is best to let them cool right down to room temperature for best results. In about an hour, they'll look like this and be ready to eat:


Once all cooled down (after a couple of hours), put the cvarci in a ziploc bag or in a container and keep them in the refrigerator. I've kept them for 2 weeks in the fridge with no problems.

Enjoy!

01 December 2009

Nano final tally

Official tally for Nanowrimo 2009: 32,580 words. Okay, not quite 50,000 but still quite respectable. Now, on to more writing and editing.

27 November 2009

Nanowrimo 2009 update

With three days to go, I'm just squeaking past 23k words in the November race to 50k words. So in the end, I'll make it half-way. This is a victory of sorts for me because I made it quite far, and this time around the quality of my writing was at a much higher standard. I went back to using the old pen and paper and somehow my writing was free, easy-going, more natural. So in years past when I made it to (or close to) 50k words, most of it was pretty bad and got lost in the ensuing edits. This year it is different. Maybe I'm finally making it past that mythical 10,000 hours of writing needed to get the hang of this thing. I sure hope so.

To anyone else riding the Nanowrimo train: I salute you. And see y'all again a year from now.

11 October 2009

Nanowrimo 2009...time to prepare....

I can't believe that Nanowrimo 2009 is just around the corner. I'll be participating this year and am planning on winning. I think I have a great idea to start with...but I'll know more as November progresses and I get past that magic page number 50. Until page 50, I don't know if I've got a novel or a short story on my hands. I don't know if the characters are interesting enough. I don't know if I have enough of a story to last another 250 pages. Yes, it can be heartbreaking to reach page 50 and realize there isn't enough there for an entire novel...but it is much easier to handle than to reach page 200 and realize there's nowhere left to go.

So, I'm looking forward to a month of butt-in-chair, fingers on the keyboard, creative marathoning.

04 March 2009

Long time no see....

Merry christmas/new years/valentine's day to everyone! Okay, so it has been a while since I last posted. I'm finding it tough to keep up with all the web-based things I've got to update: blog, facebook, knitting sites, meetup groups, etc. I'm going to pare it all down somehow so that things don't get left dangling for too long without attention!

Anyways, I'm learning the fine art of eating fish whole. This beautiful branzino was fresh caught, then grilled over a wood fire. Served up with olive oil and a side of swiss chard and potatoes. It weighed in at about 3.5 pounds...and I ate HALF of it!

Before:


After: